
The two fold experiment.


I think I’m all folded out now.
Next step.
Stones.
–
–
–
I’m not sure if I’m actually going to use all of my ‘mistake’ silver for cuffs,
but here’s number two.

I don’t know if I like this one as much as the first, but I wanted to see if I could do a long fold this time.

Perhaps I’m not liking it because it’s a bit girly for me.
I think it looks like the frill at the end of a piece of fabric.
You know, that embroidery anglaise stuff.

I’m not really a frilly person.
I am kind of liking the challenge and definitely want to explore a few more designs, but I also ordered the correct size of silver yesterday so I’m looking forward to that as the stones are calling.
Right now, however, I feel as if I’m in the twelve cuffs of Christmas movie.
–
In other news, I’m about to send $1,000 to Doctors without Borders.
Thanks to everyone who has bought a piece of jewelry from me, I can’t believe I’m up to $24,000!
–
–
–
It was a bitter-sweet experience.

Bitter because I made a mistake buying my silver..

And sweet because I made a mistake buying my silver.

Here’s to your mistakes.
May you always take them by the throat and beat them senseless until you win.
–
–
–
Only that’s probably what happened in the first place.
I usually buy my silver in 6×6″ sheets. I buy one of 22 gauge, and one of 24 gauge.
Since I’ve been layering my bezel designs more I’ve noticed that I’ve only been using the 24 gauge as the layers add to the weight nicely and the 22 gauge seems a bit of overkill.
Last week I looked at my cabochon stash and thought that I may as well break down and buy some more silver as I was ordering wire anyway, but this time I would forgo the 22 gauge for a 6×12″ sheet of 24 gauge instead.
Sounds o.k. so far doesn’t it.
UNTIL
I received the package yesterday with TWELVE 6×1″ bars of silver.
All $165 worth. Staring up at me from its small, but heavy little, look at me and my slim self, package.
Now, let me ask you. What’s a girl to do with one inch strips of silver when it won’t cover half the back of most ALL of her cab designs!
I tried hard, I did, to make it Rio’s mistake, but wouldn’t you know it, it was my mistake.
Yep another one.
One of many that make up my life.
So now I suppose all that’s left is for me to do is to make cuffs.
I haven’t made many of them, but I’m sure twelve will fix that.
Should I start with copper is all that’s left to decide now, before I barge into the unknown depths of cuff making?
Nah.
Where would be the fun in that.
My only comfort is that one strip cost only $12. Not a big comfort, but at least the disaster could have been worse.
I could have decided I needed 16 gauge.
Then I would have had to leave me.
Here are some things I’ve just made, one of which would have fitted on the 1″ sheet, but oh well, too late now.
This would have fit.
coyamito agate Don’t ask, I’d never heard of it either.
O.K. so this one would just have fit also.

coral fossil
This wouldn’t have fit.

coral fossil
But, ah, this one would have.

turquoise
So maybe there’s hope after all.
–
–
–
Good bye.
I won’t say good riddance because I believe she was brought kicking and screaming into this world for a reason.
As a reminder to always trust my instincts.
A whole month ago I sent off one of my favourite bracelets to Washington.

But she never arrived
:(
Finally I found out the tragic truth.
That she was lost forever on this vast place we call Earth.
Although I hate to admit it I think it was my fault.
I posted it on Columbus Day, because even though I’ve lived here for twenty five years now I never can remember which holiday is which and when it’s going to happen.
I always accused the kids of lying to me when I found them still in bed on school days.
It took a lot of convincing on their part for me to finally believe that it was actually a bank holiday and that they weren’t just trying to pull a fast one on me.
So it only occurred to me that it was a holiday after I admit to being slightly horrified that the postman/lady/crossgender, (also known as gender fluid), still hadn’t emptied the post box at three in the afternoon.
What were they doing! I had important things to post.
So I stuffed my package into the full to brimming post box (does it mind being called a box?) and sat in my car looking at it.
I almost took it out again. Federal offense or not.
But my ever optimist self decided that it would be completely safe until the post person finally decided to make an appearance.
Always trust your instincts people, and brush up on your bank holiday trivia.
I believe now that my lovely aquamarine favourite bracelet was taken.
I hope that if this is the case that the person needed it, and that it will spend many fine years with them, or, more likely be sold off to pay for something else that they need badly.
Like a kick up the backside.
Goodbye dear friend and may you ever know that you were once loved.
(Too much?)
So, the very nice lady, whom I’d been in contact with throughout this trying period, told me that she would take Tiffany as a replacement. Even though she had read about her harrowing delivery into this world.
I can’t lie, it almost brought a tear to my eye.
Almost.
So now she’s off, and yes, with a little good riddance, but also with some gratitude.
So to all my good cyber space friends
May you all keep in good health and never stuff your packages into overflowing post vessels.
–
–
–
Let me present to you today the bezel from hell.

First I melted the collar right off its base.
(See yesterdays post)
Second, after I’d lovingly and painstakingly made Tiffany a new home her corner broke off and so, even though perhaps this was a tad childish, I stomped out of the studio and left her on the floor overnight in disgust.
At this point, let me tell you, I almost broke off our relationship.
Third, after all I’d done for her. After making up and nursing her back to health, what happened? She wouldn’t lay flat in the bezel but showed off and rocked backward and forward like she was on a seesaw.
Not just a little, a lot.
And lastly, never one to walk away from a fight, I finally set her stone-like self, rather well I thought considering I had to grind flat the inside of the bezel forever, and would you believe it, the bottom jump ring fell off, even though I’d checked and double checked that it was secure before I put the stone it.
I almost threw the thing in the bin at this point.
But.
The glutton for punishment I am, I took that darn stone out of the bezel and re soldered the jump ring onto it
again,
then set the stone
again.
Mwahahaha. Take that Tiffany baby.

Tiffany Stone and simulated Alexandrite.
I forgot to take a photo of the back because I hate it, but felt that as this was the reason I didn’t just start over in the first place that you should get a dark, shadowy, depths of hell, glimpse of it.

I believe that this was all Jane’s fault.
;)
Here’s another one which I ended up fiddling with more than needed.

Ocean Jasper and Tiger Eye
It just wasn’t doing it for me so I took the stone out (I’m getting quite good at that now) and tried to give it a little more substance.

Ocean Jasper
Still not completely convinced about the back though.

It’s Friday people!
A good weekend to you all.
:)
–
–
–
The bezel….continued.
I wrote this at the weekend and wanted to finish the piece before I posted it.
I shouldn’t have bothered as it all went bottom’s up from there.
I will show you the first bit, however.
Especially for Jane.
–
This stone was too tall for my thin bezel wire, and too short for the super duper thick bezel wire.

Tiffany Stone
As I only have the two widths of wire in my supply kit, I chose the thick wire.
Which, as it turns out, is perfect for my notes to Jane.
–
Solder the bezel wire together on one of the flat sides of the stone. See – HERE for soldering tips. It’s not a good idea to solder at a corner or point. I like the join to be in a place that can be hidden by some of my design.

At this point although the bezel is cut to fit the stone it’s probably been distorted slightly during soldering. I like to run my flat nose pliers, or burnishing tool, around the edges to really make sure it all fits snug to the stone. I also take my flat nose pliers to define the sharper corners by folding a line at the tip edge of the stone.
This gives it a nice, crisp, finished look.
The bottom shape of the bezel wire is the most important as this is the part which will be soldered to the sheet metal. If the bottom of the wire is not exactly the shape of the stone it will look bad and the stone won’t fit correctly in the collar again.
As you’re pushing the wire to the stone (see below) you can distort the top edge of the wire by unintentionally curving it over the top of the stone. Although, in a pinch, you can straighten the sides of the bezel once you’ve soldered it to the back plate this is not the best approach. I take the stone out of the bezel wire through the bottom of the collar, and replace it in the collar from the top to ensure that the stone fits nicely into the bezel from the top once I’ve soldered it.
I do this several times until I’m satisfied that the stone passes smoothly from the top through the bottom.

When you have done this and sanded both the bottom of the collar and the surface you’re to solder it onto make sure one more time that the stone fits before you solder.
I suppose you could do the sanding first
;)
I guess I’m stuck in my ways.
It seems a lot of checking, but once you get the hang of it you don’t need to do it as much.
Once I’ve soldered the collar to the backing plate I like to drill a hole in the bottom so that I can get the stone out again.
I do this because I usually have a design on the back of the pendant and you don’t see the hole afterward. You can run dental floss across the bottom of the stone if you don’t want to drill a hole. This gets it out fine also.
The main thing is that it’s important to be able to get your stone out again as you trim your collar.

Now put the stone back into it’s setting.
I’ve got a wonky stone here which I hadn’t noticed before.
:(

Ignore that and run your pencil around the top of the stone and mark the inside of the collar.
Be careful not to mark the stone. Pencil will generally come off, but I wouldn’t want to get Sharpie on it for instance.

Take the stone out of the setting.
(See. Really wonky.)

I used my snippers to cut away most of the unwanted wire.
Usually this isn’t necessary unless you have odd stones that don’t fit the regular widths of wire, or you don’t have it on hand. You can make your own bezel wire from sheet metal, but I like the pre cut wire.
Lot less fuss.
I snipped here because it would have taken too long to file down and I would have gone out of my mind with boredom.

Sometimes it can be a bit tricky, just snip gently.

Then fit the stone back in again to see if you need to snip more.

At this point use a file or sanding disc on your Dremel or Fordom to file away the rest of the bezel wire down to the pencil line.
You might just be able to see in the photo below that I have marked a dip in the pointed corner with a pen, and less visibly, a slight dip at the curved corners.

By sanding these points away slightly when you push the bezel wire over the edge of the stone it will look cleaner.

I graduate the curve into the corners.
(Sorry about the grubby hands. I fired my hand model last week and haven’t found a replacement yet who’s also willing to make the tea.)

O.k. So.
That’s when I had to go in to make dinner.
(Note. You should never turn your back on a piece that is all going according to plan. You may never get back the magic.)
The next day all hell broke loose.
Oh yes it started out rosy.
I made the piece a nice dangly thing with a small set stone.
(I was going to show you how to set the tiny stone Jane, but thought that might put you over the edge and so decided to save it for later.)
I fashioned a lovely design for the back, and a bale for the chain.
Then, in the blink of an eye when my concentration turned to which song I should sing at my X Factor audition – Nina Simone, or Billie Holiday – I soldered the bezel right off that backing plate, and had to swear a little (only in my head mind) when it melted away down one side.
Time of death was around three o’clock central time.
Not one to give in I made it another collar which, because I was ticked off, never did quite fit the stone as well as the first one.
I think I was trying to punish the stone at this point but rather bit off my nose to save my face.
As I had already filed down the plate after I’d soldered the first collar I had to be extra careful fitting the second one to the back. I could’ve made it all new, but I’d already put my design on the back and darn it if it was going to beat me.
As a consequence, will all my fiddling, the corner of the #$$^&*#! stone broke off and fell onto the floor where I decided to leave it until I was in a better frame of mind.
At this point the atmosphere in the studio was a bit tense, to say the lease, and Willow had to hide.

Bless her.
–
Actually Willow always hides there even when I’m singing.
O.K. probably because I’m singing.
I hope that’s not why she’s gone deaf…
–
All said and done, however, I think Jane that you might be able to get something out of this mess to help with the first stage of bezel setting.
I’ll try to collect myself enough to make a complete one next time.
–
–
Too depressing?
I wouldn’t want Simon to roll his eyes.
My only other choice is the lonely goatherd.
Only Willow physically shakes when I yodel so I have to use hand signals on that bit.
I think I’ll stick with Nina.
–
–
–
I didn’t tell you yet that I was able to send off my $3,000 to charity this week, and that I almost have another $1,000 to add to it!
It’s the best I’ve done yet.
You can see where it went – here.
I’m not sure yet where the next $1,000 will go. Maybe Doctors without Borders, or Heifer International.
I might need to pick the more uplifting of the two this time however and send someone a cow.
–


–
–
–
I came in for lunch, as often happens at lunch time …

yum,
and thought I’d watch the news on the t.v. as I ate.
But,
and you might have to prepare yourselves for this,
while I was searching for the news my finger froze on the shopping channel.
Yep, I watched those shopping channel t.v. women flaunt their beautiful hand model hands loaded with rings and bracelets and more rings and bracelets, and chat knowingly and covetously as they took out their rulers and measured their treasures right before our eyes.
It was the jewelry extravaganza experience of all jewelry extravaganza experiences,
and I couldn’t look away.
O.K. I could, but I’m embarrassed to tell you that I didn’t
I was scouting for new ideas and techniques.
Or so I’ll tell anyone who asks.
Anyhow, I can’t actually remember what I learned – except that I’d never make it as a hand model, or be able to sell a product that convincingly, but it did spur me back into the studio, if only to get away from the nice lady and her sales banter.
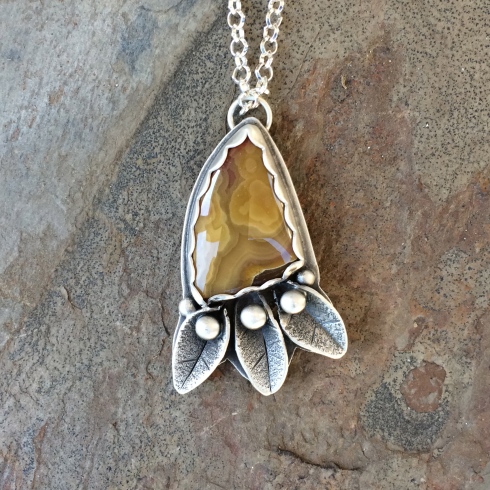
To shake the images of women hawking rings from my mind I decided to practice my sawing skills.

I had this great plan see.
I was going to cut out a design and then solder it onto another sheet of silver to give it depth.

I planned to use various thicknesses of silver and had a good idea of how all the pieces would fit together to make a beautiful pendent with depth and feeling.
But I kept forgetting the plan, and the sequence of the pieces kept getting muddled, and in the end I had to wing it more than I wanted to.
Those leaves are winged more than I wanted them to be.

Nice stone though.
And that cut out on the back ended up a good few millimeters the wrong side of perfect.
Don’t even mention the loop.

So what with that, and this,

Which I’m having trouble polishing.

I got out of bed this morning and shouted determinedly to P that I had given up making jewelry – again.
He called bull@##* which kind of irritated me as he knows me so well.
But there’s just too much going wrong right now.
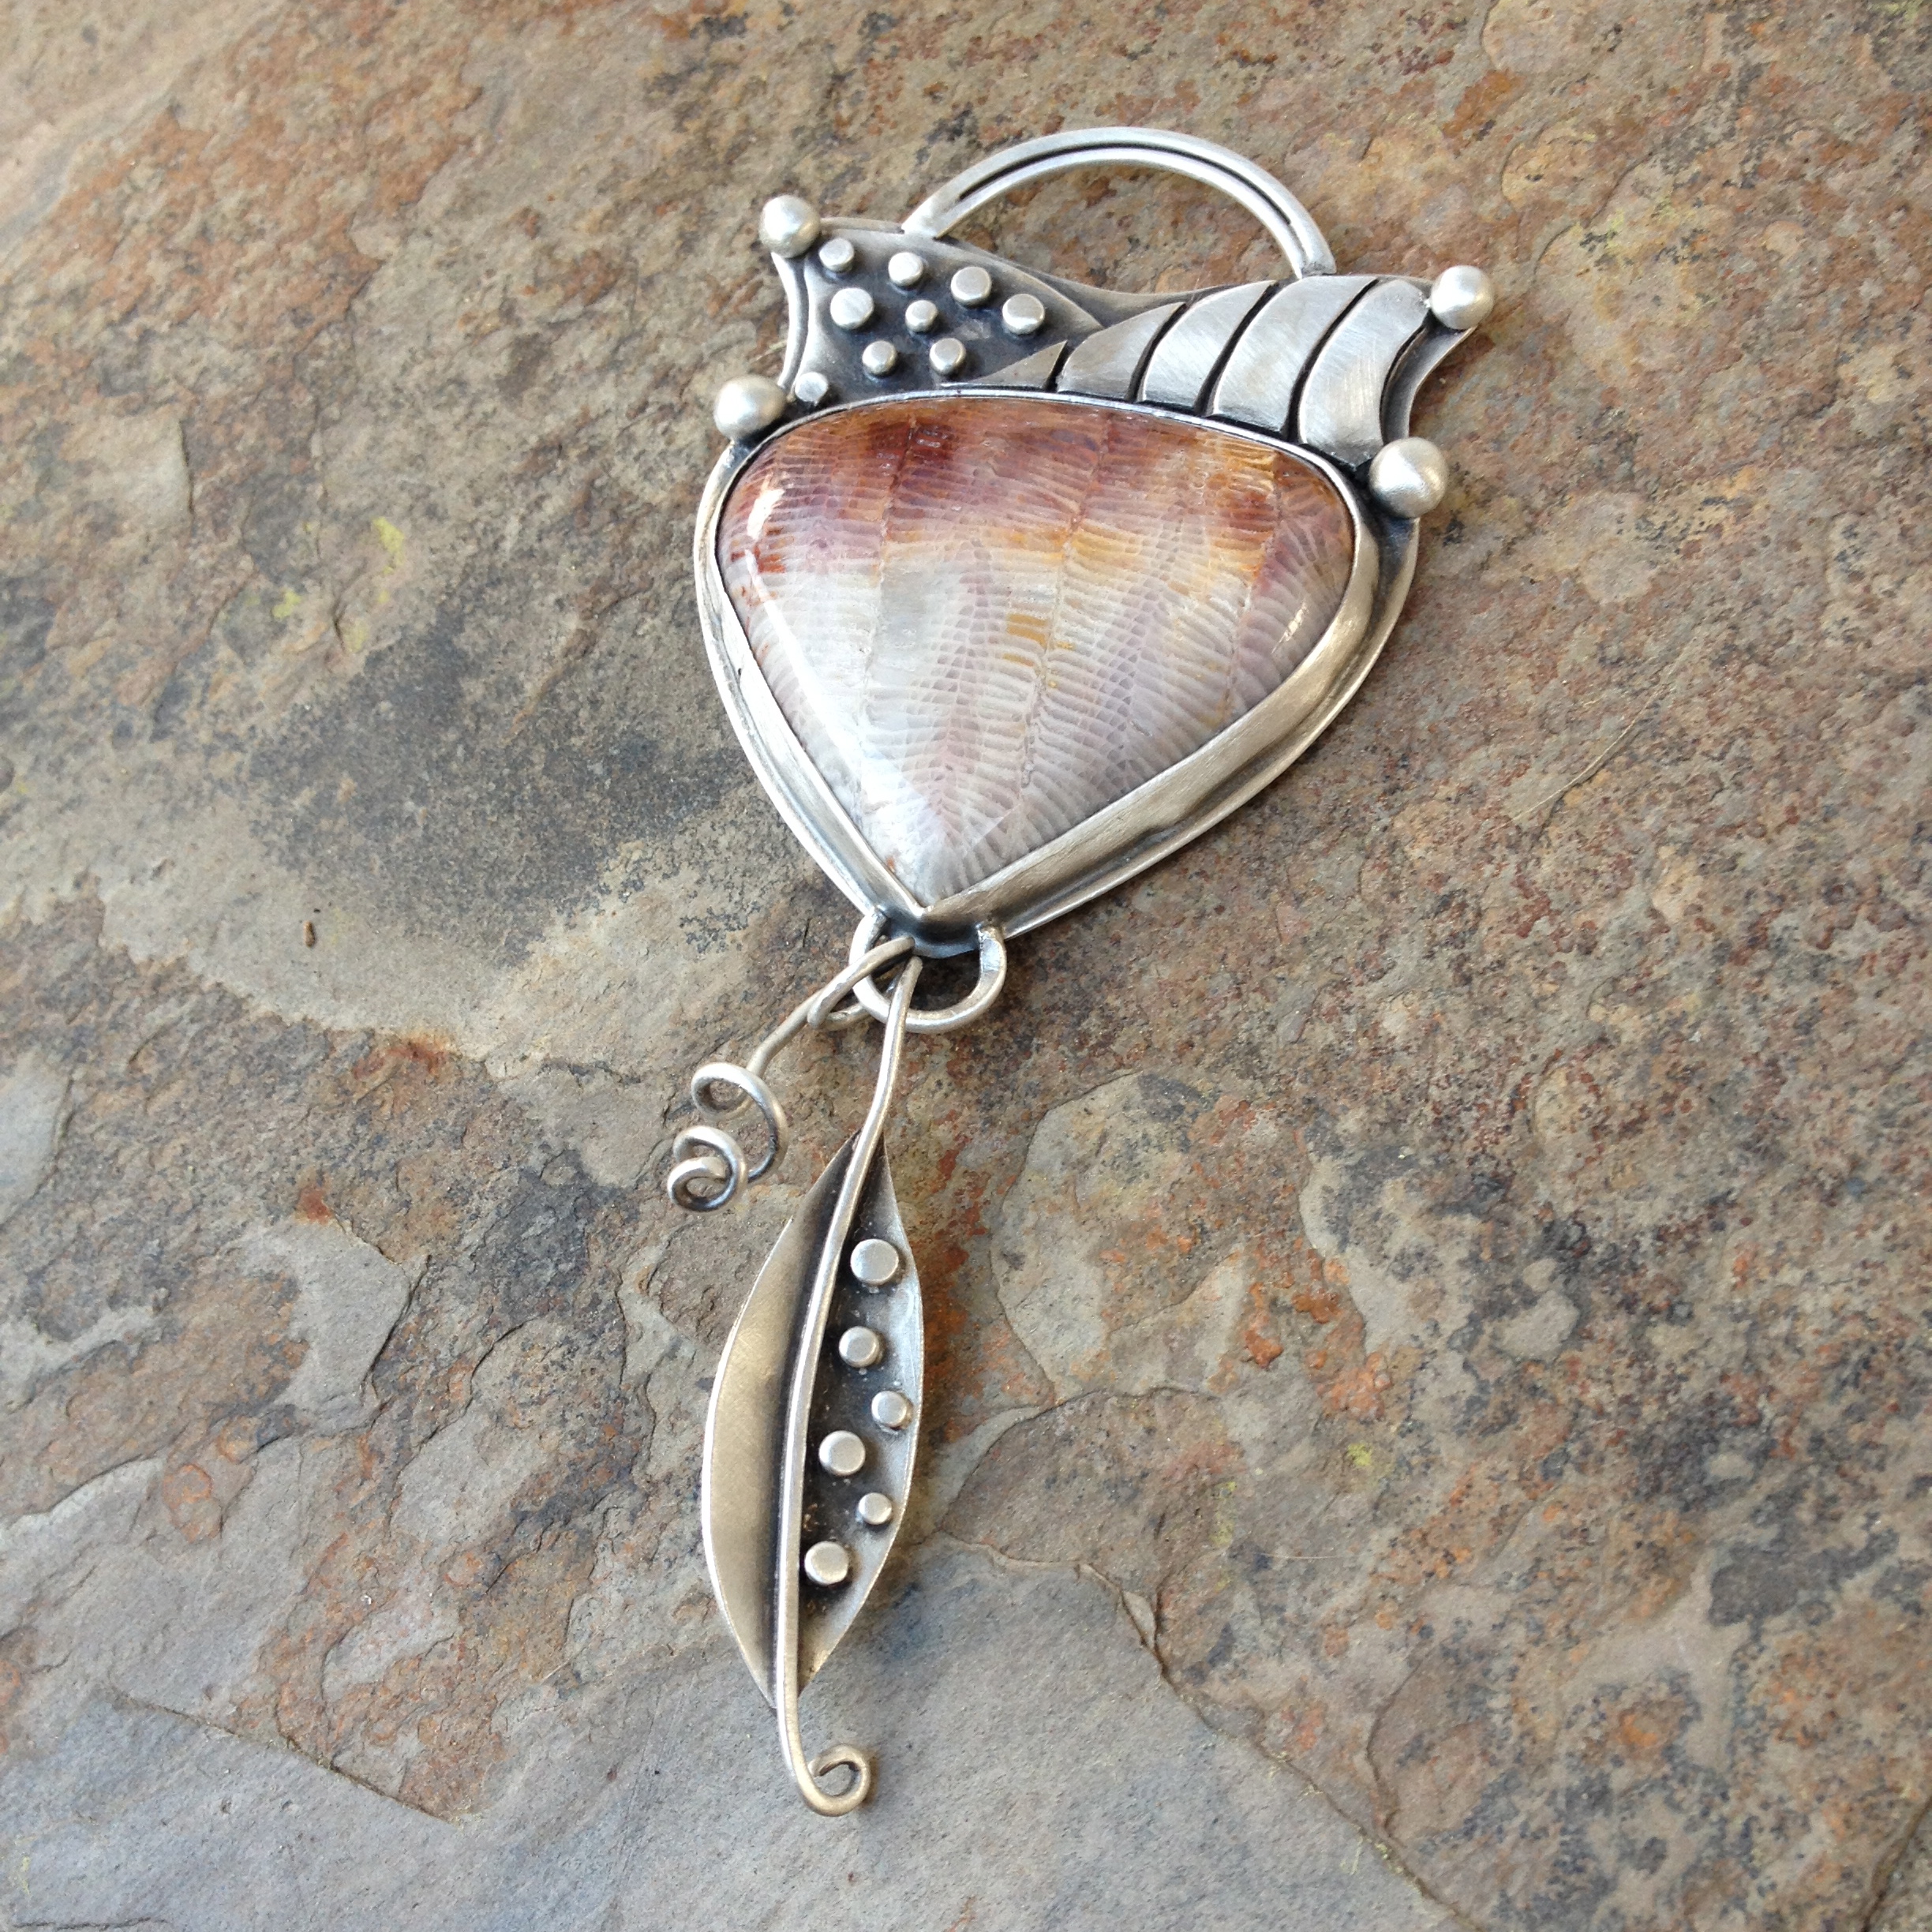
Take this.

o.k. so don’t ask me why I bought it
Well it broke.
Not just the corner either, but right down the middle,
and so now it’s this.

See how I tried to give it that special rough/smooth design feature, and there are those leaves again that are more winged than they needed to be.
Don’t ask me about the curlywig either.
I even broke the top of the drop bead and had to rearrange its particles until it could be bezel set.

On the whole I know they didn’t come out too badly, but I get irritated with myself for being just a few steps too many away from getting it right first time.
Finishing the piece is my biggest problem. I’d like to take a class on cleaning and polishing. I get it almost right, but really would like to feel confident with what I’m doing.
I did make a ring though which I’m fairly happy with.
I usually shy away from making them as I’m not sure what size to make them, but yesterday I threw caution to the wind and made one to fit my hand, even though I will never wear it.


It’s a nice piece of turquoise.

And then I took a few old pieces and gave them a little more depth.
This one was very flat before.

And this one was horrible.

But now looks a lot better.

And lastly a painting, which I’m still working on.

I love the colours in this one.
–
On Saturday I met Penny of Penny’s Treasures.
It was kind of strange meeting someone who I’ve only ‘chatted’ with on this blog, but it was really nice to meet her and see her work at the craft fair she was attending.
Penny, I hope that you had a good day. The weather was perfect, I’d say, although I bet it was a bit chilly for us Houston folk in the morning.
:)
–
–
–


The Reluctant Caveman

